Certificates & Seals
Calibration documents
DAkkS-accredited calibrations are standard in many industries. esz AG calibration & metrology is accredited as a calibration laboratory in accordance with DIN EN ISO/IEC 17025:2018. For over 45 years, we have been calibrating your measuring devices independently of manufacturers according to standardised processes and in compliance with all current standards. The calibration certificate contains all the data, functions and specifications of a piece of test equipment and enables calibration results to be verified by colleagues, customers or during audits. At esz AG, ISO calibrations have the same complete traceability, specifications and quality features as DAkkS-accredited calibrations. This is because we do not differentiate between DAkkS and ISO calibration certificates, neither in terms of the measurement methods and series of measurements, nor in terms of the procedures and requirements. A clear added value for you.


Digital or printed certificates
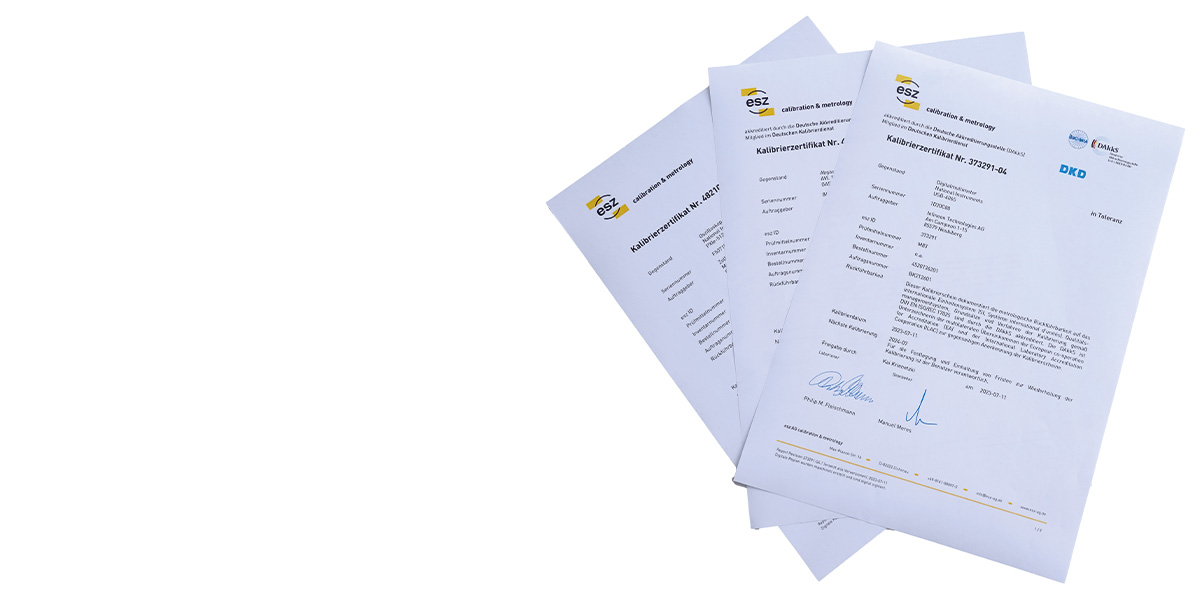
You will receive the calibration certificate quickly and easily together with your measuring device. You decide whether you want the calibration certificate digitally as a pdf document or as a paper document. Nevertheless, esz AG is committed to sustainable environmental protection: The printed calibration certificate contains a brief overview of the information on the calibration item and procedure, the ambient and measurement conditions, the location of the calibration, information on the measurement uncertainties and the evaluation of the position of the measured values within or outside the specification. You will receive your complete calibration certificate, including detailed measured values, in digital form as a pdf via our calibration certificate portal or your asset expert access. We also offer digital file formats such as VDI 2623 or DCC for your calibration certificate.
The calibration mark
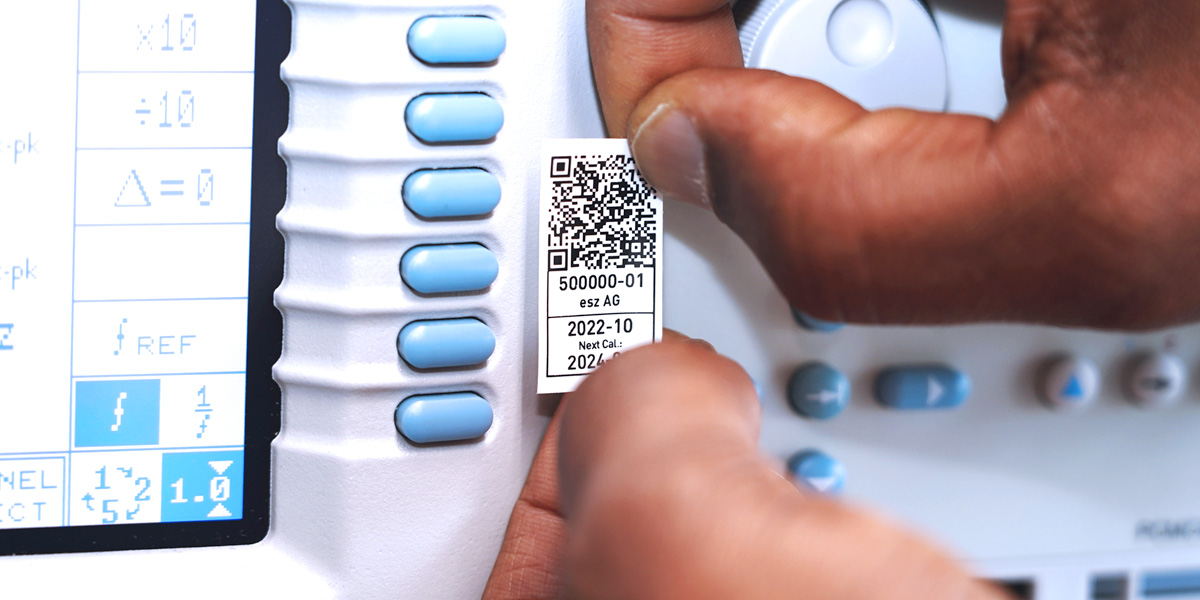
Security and trust are invisible. With the esz calibration mark, however, these key concepts of quality and reliability take shape: After calibration, each measuring device receives a calibration mark. In addition to the unique calibration certificate number, the calibration date and the date of the next calibration, this also contains a QR code that makes it easier for you, your users and your auditors to work with results and measured values. The encrypted code can be read with any smartphone, tablet or handheld scanner. You have access to the respective calibration certificate of the measuring device as a PDF document within seconds. The QR code only allows access to the calibration certificate of the measuring device, but not to read or change all data of the test equipment owner.
You therefore benefit from the high level of encryption and data security combined with lightning-fast retrieval of the relevant information. The use of the new calibration marks simplifies and speeds up the retrieval of calibration certificates and increases transparency for the user and in every audit.
Calibration certificates
esz calibration certificates contain basic information such as the calibration item and procedure, ambient and measurement conditions, calibration location and information on the measurement uncertainties as well as other important details:
DIN EN ISO/IEC 17025 compliant: The esz quality management system fulfills all requirements of DIN EN ISO/IEC 17025:2018. esz calibration certificates are structured and structured according to the criteria in section 7.8 of the standard.
Factory calibrations in the full DAkkS scope: Regardless of whether it is an ISO/factory calibration or a DAkkS-accredited calibration: esz AG does not differentiate between calibration methods, measurement series, quality and scope of calibration. We carry out factory calibrations to the same extent and under the same conditions as accredited calibrations. The services differ only in the cover sheet of the calibration certificate and the accreditation symbol.
Live measured values of the ambient conditions

Instead of simplified intervals of ambient conditions, esz calibration certificates contain the real-time measured values of temperature, humidity and air pressure that were accurately measured during calibration in the esz laboratory.
Detailed feedback chain

In addition to the accreditation symbol, the esz calibration certificate guarantees metrological traceability to the SI system of units or to the metrological references by showing the uninterrupted traceability chain of the test equipment and calibration equipment.
Standard-compliant decision rules
The so-called “ILAC evaluation” (ILAC = International Laboratory Accreditation Cooperation) is used to define the specified decision rules and their measurement step identification in esz calibration certificates (not in accordance with the specifications in the example in red):
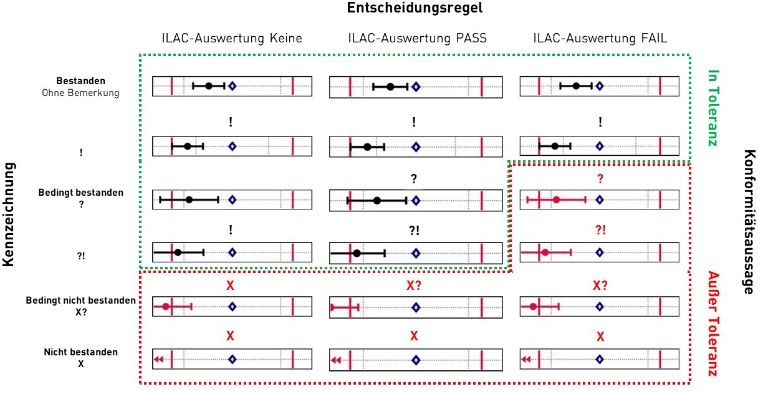
- None: Decision rule according to ILAC evaluation “PASS”, but there is no risk marking, i.e. question marks are not displayed during calibration and in the calibration certificate.
- PASS: Standard decision rule according to the esz QM system of esz AG. Measurement results according to ILAC-G8:09/2019 Fig. 5, Pass and Conditional Pass are assessed as compliant with the specifications. Cases according to ILAC-G8:09/2019 Fig. 5, Conditional Fail and Fail are considered to be non-compliant with the specifications.
- FAIL: Decision rule according to DIN EN ISO 14253-1:2018-5.2 (on customer request). Measurement results according to ILAC-G8:09/2019 Fig. 5, Pass and Conditional Pass are assessed as compliant with the specifications. Cases according to ILAC-G8:09/2019 Fig. 5, Conditional Fail and Fail are considered to be non-compliant with the specifications.
Precise risk evaluation

Each measurement step is checked for the specific risk of the conformity statement (conformity test). Six cases can appear in the “Remark” column:
- Passed – without remark: >95% probability safe within the specification (ILAC G8:09/2019 Fig.5,Pass)
- !: Passed – without remark: >95% probability safe within the specification
- Conditional pass – ?: taking into account the measurement uncertainty (MU) with a probability >50% to 95% within the specification (ILAC G8:09/2019 Fig.5, Conditional Pass)
- ?!: above the intervention limit but with a probability of >50% to 95% within the specification, taking into account the MUhin the specification (ILAC G8:09/2019 Fig.5, Conditional Pass)
- Conditional fail – X?: taking into account the MU with a probability >50% to 95% outside the specification (ILAC G8:09/2019 Fig.5, Conditional Fail)
- Fail: >95 % probability safely out of specification (ILAC G8:09/2019 Fig.5, Conditional Fail)
Graphic display of measured values
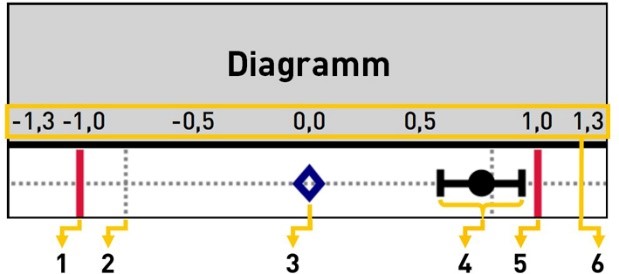
| 1: Lower specification limit | 2: Intervention limit | 3: Calibration value | 4: Measured value incl. measurement uncertainty | 5: Upper specification limit | 6: Standardised tolerance zone |
The measurement steps are displayed graphically as a line diagram. This makes it possible to see at a glance whether and how well the tolerances of the test specimen are maintained relative to the target value.
Comprehensive reporting
In addition to the statement of conformity with the specifications, esz calibration certificates contain extensive data and terms, such as
- Deviation: Indication of the difference between the measured value and the calibration value of the measured variable
- Note: Conformity check per measurement step (ILAC evaluation)(ILAC-Auswertung)
- Intervention/warning limit: set to 80% by default and can be customised
- Conformity assessment: Demonstration that specified requirements are fulfilled [“in tolerance”] or not fulfilled [“out of tolerance”], i.e. determination of the conformity of measurements with the specifications (successful conformity tests per measurement step). The specifications were based on manufacturer information or application requirements when the order was placed.
- MU: Measurement uncertainty; estimated value for the range in which the calibration value of a measured variable lies, determined in accordance with EA 4/02
- Specification – The specification of the accepted properties of a device by the user:
– %rdg: Per cent of measured value (reading = display) – D: Digit (least significant digit of the display) – FS: Full Scale (full scale) – ppm: parts per million (10-6) – ppb: parts per billion (10-9) – rdg: reading (display)

Your calibration offer
We’ll be happy to provide you with a no obligation quote for the calibration of your measuring devices.
Your benefits
- Identical standard for DAkkS and ISO calibrations
- Calibration certificate available in digital (complete) and printed form
- Retrieval via Calibration certificate download or asset expert
- QR code links directly to calibration certificate
More information
The code consists of a 128-bit GUID (Global Unique Identifier) with over 3.4 – 10^38 (equivalent to a 34 with 37 zeros) possible combinations (for comparison: the number of possible combinations in the 6-out-of-49 lottery is around 3.4 – 107). In addition to the high level of safety, there is another difference compared to the device labeling of other calibration laboratories: The QR code only allows access to the calibration certificate of the measuring device, but not the reading or changing of all data of the test equipment owner.
You therefore benefit from the high level of encryption and data security combined with lightning-fast retrieval of the relevant information. The use of the new calibration marks simplifies and speeds up the retrieval of calibration certificates and increases transparency for the user and in every audit.
With the introduction of a clear corporate design for esz AG and the adaptation of the calibration certificates, the cover sheets and subsequent pages have been fundamentally revised. Further information can be found hier.
Download an overview of the terms and illustrations on our calibration certificates: Download
Any person or company is permitted to carry out factory calibrations as long as they have a physical measuring device available.
As a rule, the difference to accredited calibration lies in the lower procedural effort required by the external confirmation body. With a factory calibration, fewer measuring points are often calibrated for calibration items that do not comply with the DAkkS / DKD / DGQ / VDE routine etc. and the evaluation of the measurement results is often not as extensive as with an accredited calibration. At esz AG, however, the procedures do not differ, but are carried out with the same standards and specifications as DAkkS-accredited calibrations.
German Accreditation Body DAkkS:
The legal mandate of DAkkS is to carry out the accreditation of conformity assessment bodies (laboratories, certification and inspection bodies). Accreditation by the DAkkS confirms that the above-mentioned bodies fulfil their tasks competently and in accordance with applicable requirements.
In the case of an accredited calibration, the requirements are confirmed by the authority (DAkkS). The benefit of accredited calibration of your measuring equipment is that it is internationally recognised.
